
Lego® Instructions Full-Auto Rubber Band PDW
NO PHYSICAL BRICKS, ONLY DOWNLOADABLE CONTENT
With the purchase of this object you only purchase downloadable PDF instructions and Parts List
Click here to download the parts list
IMPORTANT:
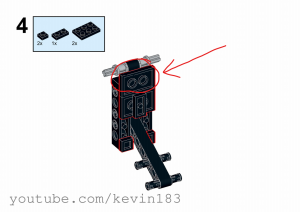
There is a mistake in the instruction on step 4: Leave out the upper 2×3 plate
20,00 €
See this in action:
This PDW features:
-capability of launching rubber bands fully automatic
-magazine fed mechanism
-mag-capacity of ~20 rubber bands (depends on what type)
-iron sights
-very sturdy gun model
-Total 784 parts
-I paid around 90€ for all parts and shipping/fees (It depends on your country)
Recommended rubber bands:
Shooting ones:
~Ø60mm https://www.amazon.com/Alliance-42199-Non-Latex-Antimicrobial-contains/dp/B0017TPZNU/ref=sr_1_13?dchild=1&keywords=size+19+rubber+bands&qid=1603714542&sr=8-13
Mechanism:
~Ø15mm Loom bands https://www.amazon.de/gp/product/B00KC06LZ6/ref=ppx_yo_dt_b_asin_title_o08_s00?ie=UTF8&psc=1
IMPORTANT:
There is a mistake in the instruction on step 4: Leave out the upper 2×3 plate


Ramen –
I cant open the .xml file. Any advice? (Also yes i have MS Office)
admin –
Hi just follow this video guide.
https://www.mocsmarket.com/customer-faq/
Let us know
Thanks!
BaseballFan56 –
I was trying to get the parts for he build but, when I put some of the item id’s into lego.com there are no results. Is there a different website I should be using? I’m really looking forward to the build! Thank you!
CsSabertooth –
Hi! Is it possible to get an XML list for just the magazines, in case we wanted to buy more parts for additional Mags. Thank you!
Z (verified owner) –
I cannot open the part list? Can anybody help?
admin –
Hi!
followe this video guide
https://www.mocsmarket.com/customer-faq/
Thanks
wardome –
Hi, can you link where the rubber bands can be found.
Elo –
Where can I buy parts for this weapon?
admin –
Hi just follow this
https://www.mocsmarket.com/customer-faq/
Marshall Banana (verified owner) –
Very solidly designed, well built gun. The price is right, and the resulting model is clever, fits well in the hand, and looks and works well. It’s a little jammy but I think it’s due to how I’m winding up the rubber bands.
A few comments:
There are blue technic pins called out that can be replaced with the older gray ones. It looks better cosmetically and there is no loss in durability. Same goes for the red axles. The tan pins are not visible.
It’s not clear in the instructions but the 1×3 lift arm on the magazine needs to be offset from the side to turn freely
In the instructions for the firing pin, it calls out a technic 32013 in step 103. If this is installed, then the firing pin cannot go mostly flush when the charging handle is fully forward as is seen in the YouTube video for this gun (around the 3:15 mark). As a result the gun will jam, the pin will pop out, and the gun will start coming apart. Recommend omitting this part for full functionality. The short technic axle is okay. Of course, maybe I built something wrong but pay attention to this part of the build!
Anyway, I am pleased with my purchase and am looking forward to a potential M249 SAW instructions from Kevin!
e –
This is a well built P 90 but I did have trouble building it but still overall a great rubber band gun.
Dung_Bui –
uhh where can i buy the pieces
admin –
You can buy on bricklink.com just follow this video guide
https://www.mocsmarket.com/customer-faq/
Thanks.
JODouble –
am new to this so do we get the lego pieces
and the instructions or do we only get the instructions
admin –
Hi!
here you can find only INSTRUCTIONS
https://www.mocsmarket.com/lego/lego-custom-instructions/
Here complete KITS INSTRCUTIONS + BRCIKS
https://www.mocsmarket.com/lego/lego-lego-custom-kits/
thanks
yes –
epik